Alaska Photography Tips | Photographing Wildlife and Landscapes in Southeast Alaska
Alaska Photography Tips
There’s so much to see, do, experience and photograph in Alaska! Over the last decade, I have been visiting this great state (mainly throughout Southeast Alaska) and have learned a few things from a photography standpoint that I would love to share with you! These photography tips are practical and I hope they help you with your landscapes and wildlife shots. If you have any specific questions, please let me know in the comment section or send me a message leveraging the form on the contact page.

Photography Tips for Shooting in Alaska
There’s always a weather condition or element that you are battling as a photographer in Alaska. It might be windy, rainy, foggy. or hazy The temperatures maybe chilly and frigid causing you to jitter around more than normal. Or you’re trying to photograph from a moving bus, boat or helicopter. All of these things add to the complexity of photographing the beauty and wildlife in Alaska.
Often times, I find myself with a split second to take a capture especially when photographing wildlife. I’ve taken quite a few shots that were blurry or completely off the mark. If you find you have a similar issue, below are a few things for you to keep in mind as you adventure outside and capture the wild world around us in Alaska.
Camera Gear for Alaska
In my experience, I have used my longest lens for most of my wildlife shots and even mountain top photographs. The Alaska landscape is big and even though a humpback whale is quite large, the mountains and waterways seem to dwarf the size of the whale. If you have a teleconverter, please make sure to take it as well.
If you’re unsure of which camera body to take, please take whichever one you have that offers the widest ranges of aperture, ISO, and shutter speed. Often times your shooting conditions will be less than ideal due to the weather so make sure your camera does well in low light conditions, fast moving wildlife and distance.
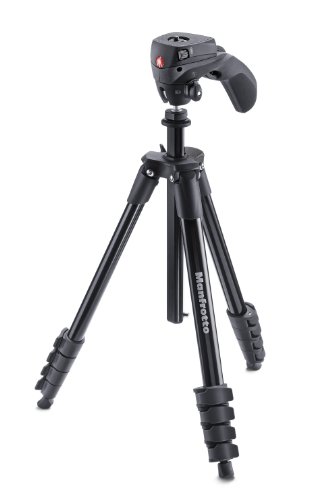
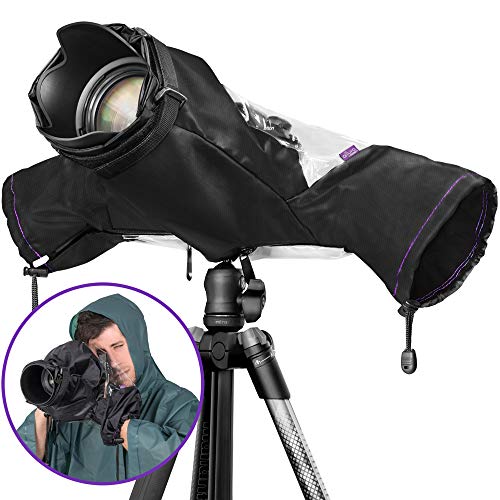
Two other camera pieces that you might find helpful are a tripod (always helpful in my opinion) and a rain cover. While a plastic bag will work as a camera cover, when it really downpours the simple investment of an actual camera cover with more solid plastic (and no accidental holes) will be worth every penny. Here are the two products that I use:
Photographer Tips for Shooting in Alaska
Patience: You know the saying, ‘Patience is a virtue’ and I have found that it could not be more critical to heed that saying than in Alaska. For example, Humpback Whales will come up for air every few minutes before they do a deep dive into the depths of the ocean. Often times, their last breath of air will be followed by their tail (fluke). If you’re patient enough, you can capture this fluke above water. Once when I was whale watching, one breeched completely out of the water! You never know what you will see if you are patient enough.
Multiple Focal Points: I started off trying to photograph humpback whales with manual focus and soon realized that for these moving creatures, trying to focus manually was extremely hard. Most DSLRs come with an automatic focus. Let the camera do the hard work for you so you can focus on things like framing, rule of thirds or even just trying to get the wildlife in the viewfinder. I have also found that the more focus points you use, the more chances you have of capturing a fast moving animal or bird. I especially found this true with photographs of diving birds.
Exercise: This seems like an odd tip but hitting the gym a few times and building your muscles for a long day of photographing is one key to successful days in Alaska. If you’re photographing wildlife, you’ll most likely be using a longer/bigger lens. Your lens is only going to be as good as how still you can keep it. Your length of time and the exposure to how many animals / birds / landscapes you have the opportunity to capture will be determined by your own endurance level. This might sound like a lame tip but its not one that most people think about until they miss the orcas swimming by because their arms are tired.
Whales: If you are new to photographing whales, consider their swimming patterns in advance. After you see a few in the water, you’ll know what I mean. For Humpback Whales, they take long, slow, deep breaths when cresting the surface of the area. On average, you’ll have 3-4 opportunities to photograph the whale’s breathing hole and then 1 opportunity to photograph it’s fluke. This might seem like a lot of time but quite often, you will need to use some of the time between when you first spot the whale to it’s final tail fluke to get closer to the whale.
Orcas on the other hand seem to come up for air more often. They travel in pods so you might see more than one dorsal fin popping above the water. Orcas tend to crest the water more often and travel faster. This means that you while you may have more opportunities to photograph their crest, they will move outside of your lens range faster. Side note - I have seen more Orcas breaching the water than I have humpback whales.
Your Alaska Photography Tips
Do you have any photography tips that you find help when photographing landscapes or wildlife in Alaska? If so, please share them in the comments below! In the meantime, check out these shots from Alaska:


